Bulk Provisioning
Bulk Provisioning Overview
NDU provides the option of bulk provisioning using the CSV file for the following types of entities:
- Devices
- Assets
Different entities may have the following parameters:
- Attributes - static and semi-static key-value pairs associated with entities. For example, serial number, model, firmware version;
- Telemetry data - time-series data points available for storage, querying and visualization. For example, temperature, humidity, battery level;
- Credentials - used for the device to connect to the NDU server by applications that are running on the device.
Import Entities
To create multiple entities at one time, you need to create a CSV file, where each line will be responsible for creating one entity with given parameters.
If you don’t need to add some settings for a particular entity, leave this cell empty.
There are three reserved parameters names: Name, Type and Label that have a predefined column type.
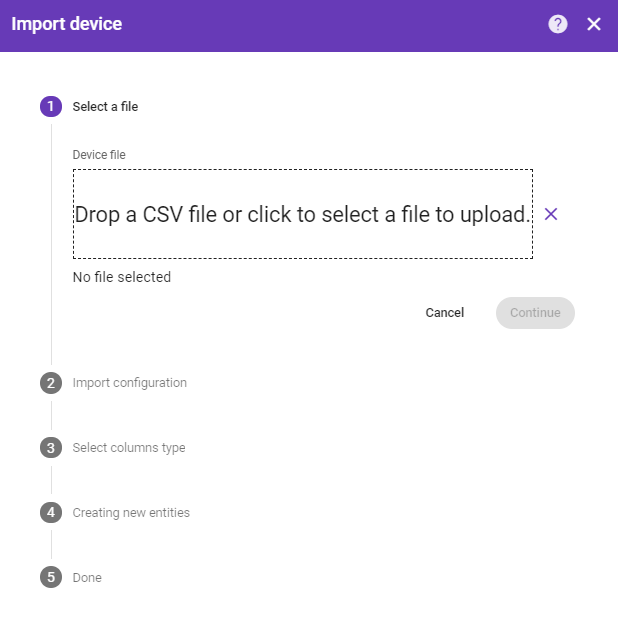
Step 1: Select a file
Upload a CSV file to the system.
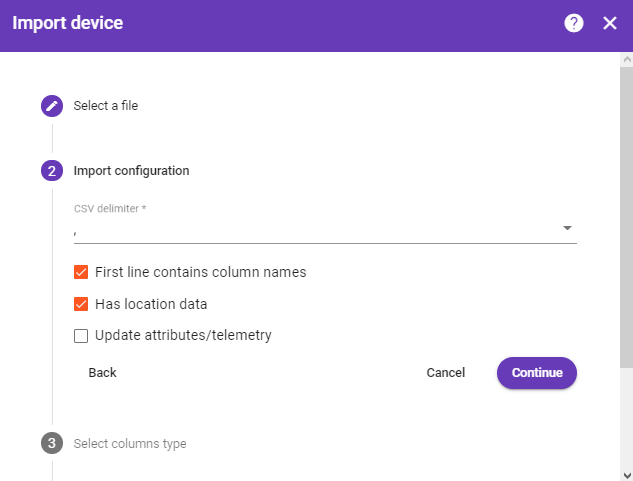
Step 2: Import configuration
For the uploaded file you need to configure the following parameters::
- CSV delimiter - the separation character between the values in the data line;
- First line contains column names - if this option is activated, the first line of the file will be used as the default values for the parameter names in the next step;
- Update attributes/telemetry - if this parameter is activated, for all entities whose names match the existing entities in the NDU system, the parameter values will be updated. Otherwise, for all the entities whose names already exist in the NDU system, an error message will be displayed.
- Has location data - If there is location data such as latitude, longitude and altitude of the devices in the data to be imported, you can select this option.
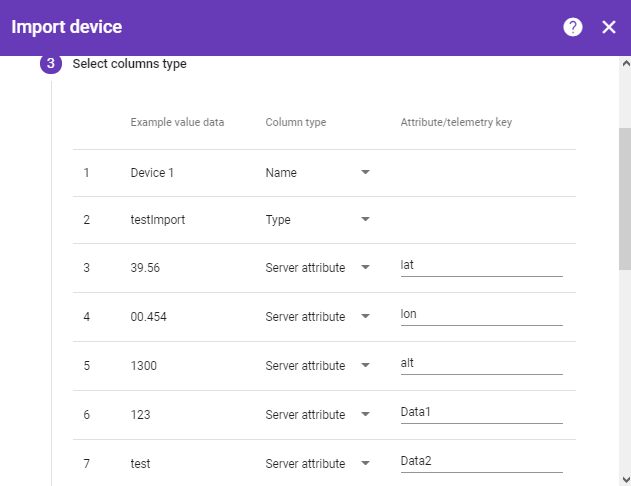
Step 3: Select columns type
At this step, you need to define a match between the columns of the downloaded file and the type of data in the NDU platform. You can also set/change the default name for attribute/telemetry key.
Step 4: Creating new entities
Processing input data.
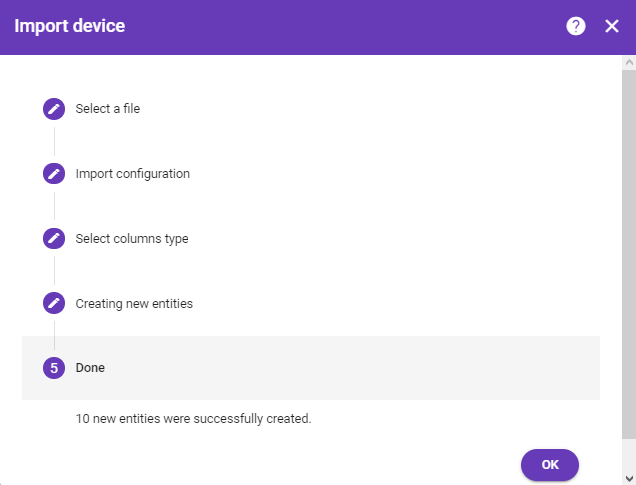
Step 5: Done
The result of the query execution: the number of created/updated entities and the number of errors that occurred during execution.
Use case
Let’s suppose we want to create at the same time 10 devices and give them an access token.
Sample file:
resources/test-import-device.csv | ||
|---|---|---|
|
Note: file should contain at least two columns: entity name and type.
File was created using the CSV file editor, it contains data for 10 devices. Also, the Data2 parameter was omitted for Device 5, it will not be created for this device.
Upload file
Go to Devices -> Import device
Upload sample file: test-import-device.csv
Import configuration
- CSV delimiter - select your editor separation symbol. In the sample file delimiter is “,”;
- First line contains column names - the sample file contains column names, so we leave this option selected;
- Update attributes/telemetry - uncheck this option, because we are going to add new devices and not update parameters for existing devices in NDU platform.
- Has location data - If there is location data such as latitude, longitude and altitude of the devices in the data to be imported, you can select this option.
Select columns type
The first column of the table displays the first file line that contains data.
Since the First line contains column names checkbox has been set on the previous step, values for the third column have already been initiated based on the first line of the document.
Let’s change some of the attributes. Change the column type in the third row to Timeseries and set the attribute/telemetry key value, for example, Temperature.
The last row in the following table is responsible for the token so change Server attribute to Access token.
Note: such column types as Name, Type and Access token can be selected only for one row.
Import finished
After the creation process was completed, some statistics information will be shown.
On the following example, we can see that 8 devices were created successfully, and an error occurred while creating 2 devices. The reason is that Device 1, Device 2 and Device 3 have the same token in the given sample file. NDU system prohibits that.