Working with Alarm details
- Use case
- Prerequisites
- Message flow
- Configure Rule Chains
- Configure Dashboard
- Post telemetry and verify
- See Also
- Next steps
Use case
This tutorial is based on the create & clear alarms tutorial and it’s use case. We will reuse the rule chains from the above-mentioned tutorial and will configure the Alarm Details function in the Create and Clear Alarm nodes. Let’s assume your device is using DHT22 sensor to collect and push temperature readings to NDU. DHT22 sensor is good for -40 to 80°C temperature readings. We want generate Alarms if temperature is out of good range.
In this tutorial we will configure NDU Rule Engine to:
- Count number of critical temperature updates for each device and save this info in Alarm details.
- Save latest critical temperature value in Alarm details.
Prerequisites
We assume you have completed the following guides and reviewed the articles listed below:
- Getting Started guide.
- Rule Engine Overview.
- Create & clear alarms guide.
Message flow
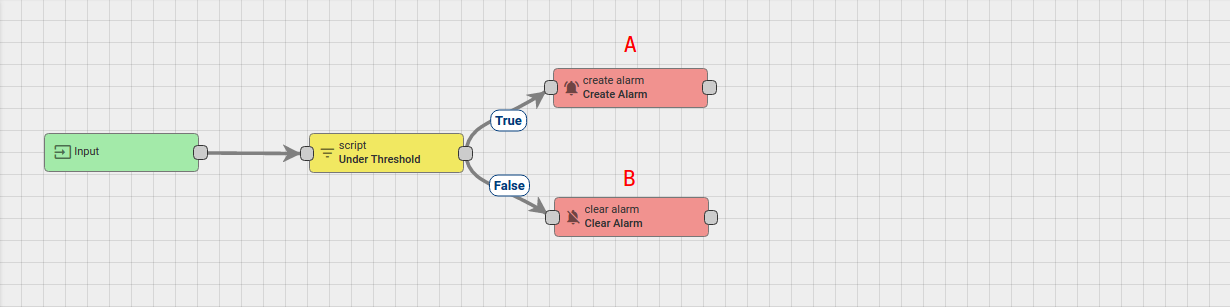
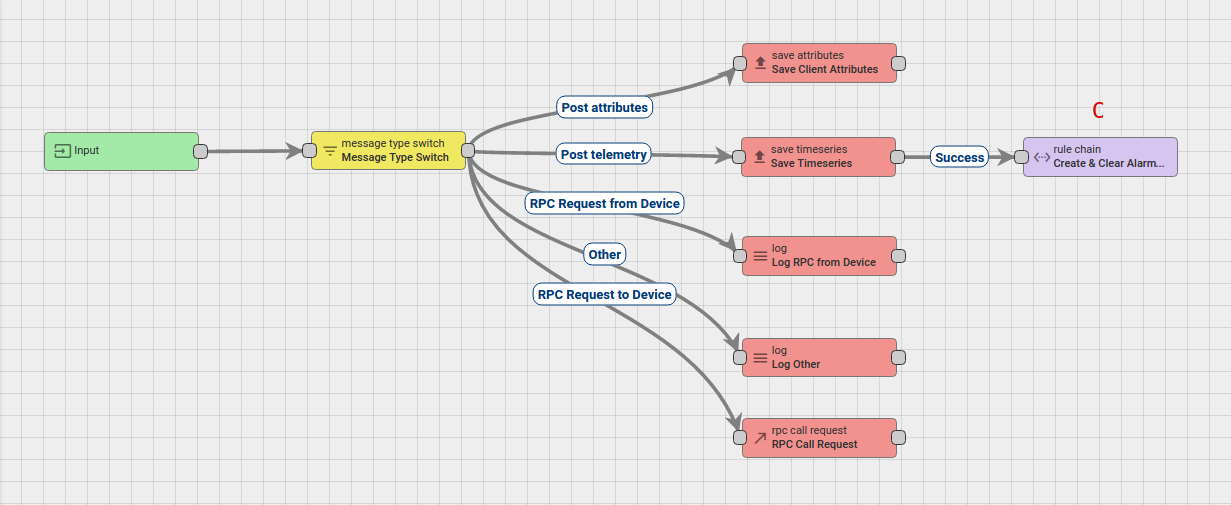
In this section, we explain the purpose of each node in this tutorial:
- Node A: Create alarm node.
- Creates or Updates an alarm if the published temperature is not at expected time range (filter script node returns True).
- Node B: Clear alarm node.
- Clears alarm if it exists in case if the published temperature is in expected time range (script node returns False).
- Node C: Rule Chain node.
- Forwards incoming Message to specified Rule Chain Create & Clear Alarms with details.
Configure Rule Chains
In this tutorial, we only modified Create & Clear Alarms rule chain, namely configured Alarm Details function in nodes that was described above in the section Message flow
Also, we renamed this Rule Chain to Create & Clear Alarms with details.
The following screenshots show how the above Rule Chains should look like:
- Create & Clear Alarms with details:
- Root Rule Chain:
Download the attached json file for the Create & Clear Alarms with details: rule chain.
Create Node C as shown on the image above in the root rule chain to forward telemetry to the imported rule chain.
The following section shows you how to modify this rule chain, specifically: rule nodes A and B.
Modify Create & Clear Alarms with details:
Modify the required nodes
In this rule chain, you will modify 2 nodes as it will be explained in the following sections:
Node A: Create alarm
If published temperature is not in expected time range (script node returns True) we want to create an Alarm. We want to add current temperature into Alarm Details field. Also we want to increment count field in Alarm Details if alarm already exist, otherwise set count to 1.
For making it we will overwrite Details function:
Details function:
1
2
3
4
5
6
7
8
9
10
11
var details = {};
details.temperature = msg.temperature;

if (metadata.prevAlarmDetails) {
    var prevDetails = JSON.parse(metadata.prevAlarmDetails);
    details.count = prevDetails.count + 1;
} else {
    details.count = 1;
}

return details;
Details function create required details object with initial parameters. Then, in if statement, we verify is it a new Alarm or Alarm already exist. If exist - take previous count field and increment it.
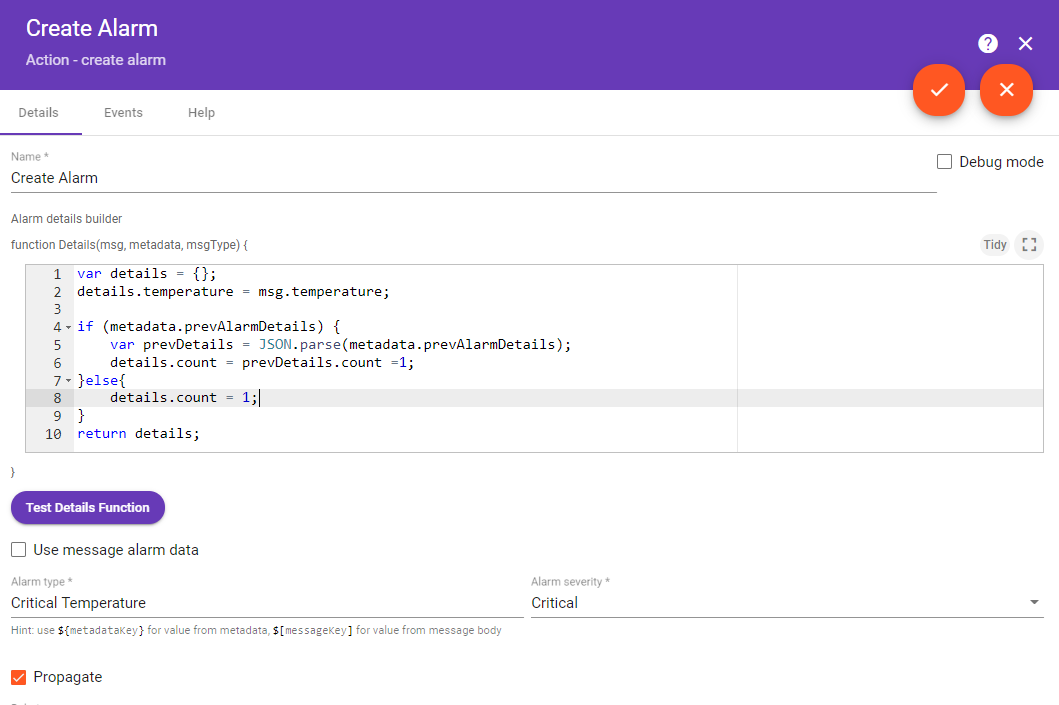
If new Alarm was created in Create Alarm node it is passed to other nodes via relation Created if they exist. If Alarm was updated - it is passed to other nodes via relation Updated if they exist.
Node B: Clear Alarm
If published temperature is in expected time range (script node returns False) we want to clear an existing Alarm. Also during clearing, we want to add latest temperature to the existing Alarm details.
For making it we will overwrite Details function:
Alarm Details function:
1
2
3
4
5
6
7
var details = {};
if (metadata.prevAlarmDetails) {
    details = JSON.parse(metadata.prevAlarmDetails);
}
details.clearedTemperature = msg.temperature;

return details;
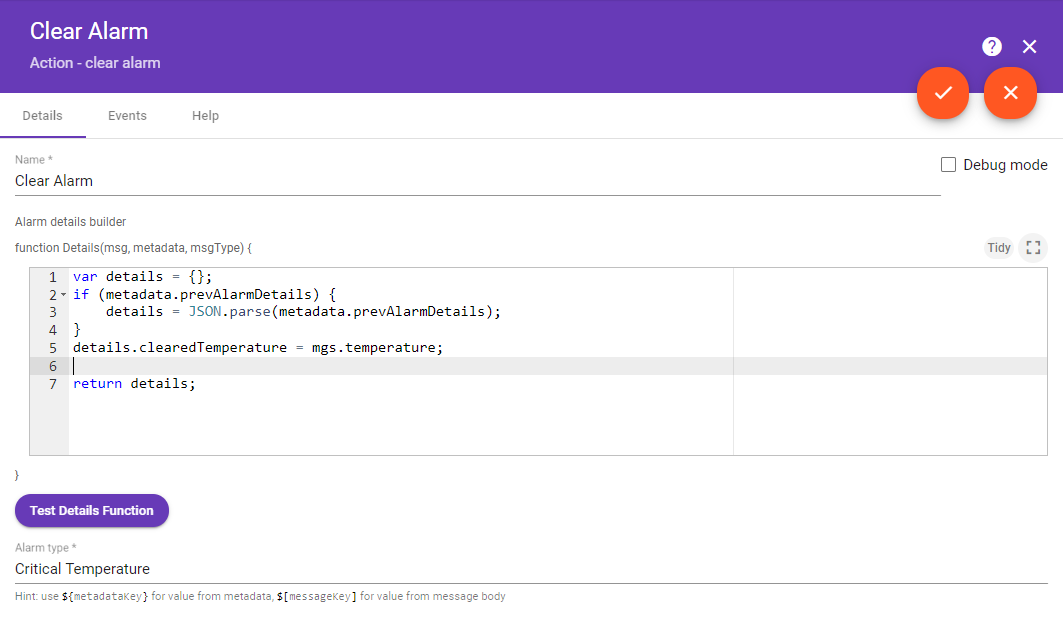
If Clear Alarm node could not find existing Alarm, nothing is changed and original message is passed to other nodes via relation False if they exist. If Alarm do exist - it is cleared and passed to other nodes via relation Cleared.
Chain configuration is finished and we need to save it.
Configure Dashboard
Download the attached json file for the dashboard indicated in this tutorial and import it.
- Go to Dashboards -> Add new Dashboard -> Import Dashboard and drop the downloaded json file.
Also you can Create Dashboard from scratch and the following section show you how to do this:
Creating Dashboard
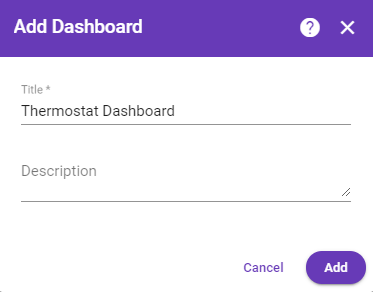
We will create Dashboard for all Thermostat devices and add Alarm widget on it. Create new Dashboard:
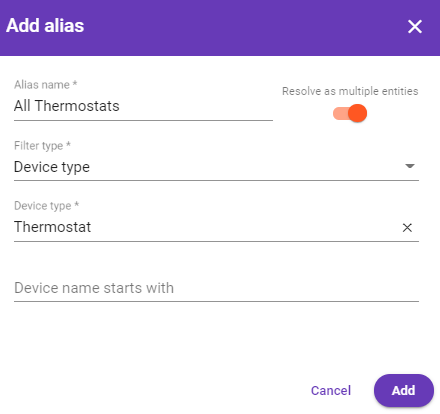
Press Edit dashboard and add alias that will be resolved to all devices with type Thermostat:
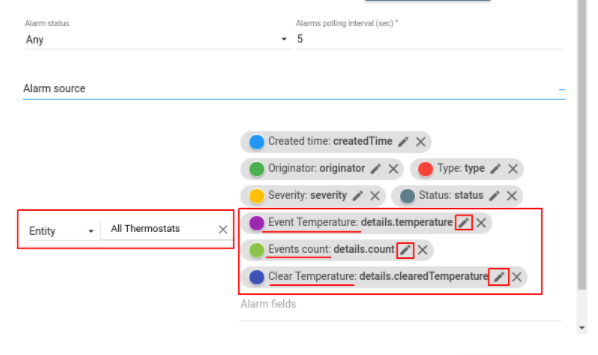
Add Alarm widget to the Dashboard (Add new widget -> Alarm widget bundle -> Alarms). Select configured alias entity alarm source. Also, add additional alarm fields.
- details.temperature.
- details.count.
- details.clearedTemperature.
And rename label of each field by press edit button on the field:
-
From: -> To:
- details.temperature -> Event Temperature.
- details.count -> Events count.
- details.clearedTemperature -> Clear Temperature.
Post telemetry and verify
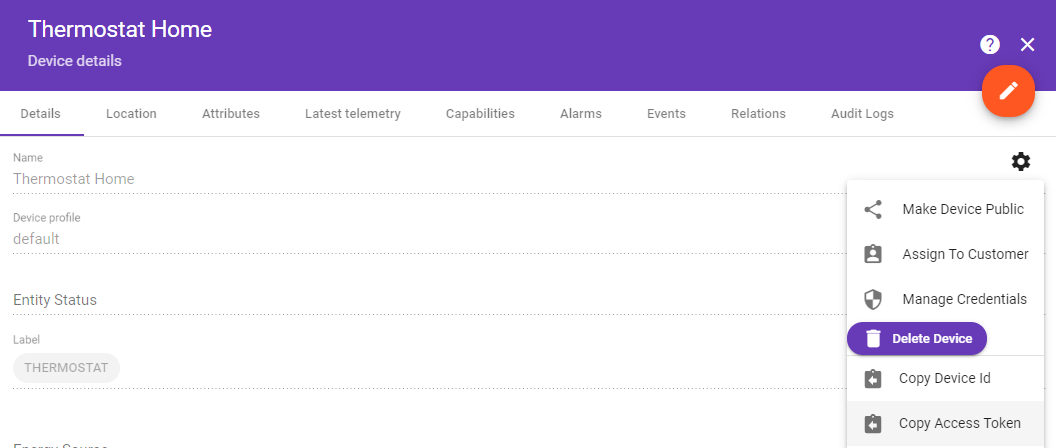
For posting device telemetry we will use Rest API (link). For this we will need to copy device access token from then device Thermostat Home.
*you need to replace $ACCESS_TOKEN with actual device token
Lets post temperature = 99. Alarm should be created:
1
curl -v -X POST -d '{"temperature":99}' http://localhost:8080/api/v1/$ACCESS_TOKEN/telemetry --header "Content-Type:application/json"

Lets post temperature = 180. Alarm should be updated and count field incremented:
1
curl -v -X POST -d '{"temperature":180}' http://localhost:8080/api/v1/$ACCESS_TOKEN/telemetry --header "Content-Type:application/json"

Lets post temperature = 30. Alarm should be cleared and cleared temperature should be shown:
1
curl -v -X POST -d '{"temperature":30}' http://localhost:8080/api/v1/$ACCESS_TOKEN/telemetry --header "Content-Type:application/json"

Also, you can see how to:
- Define an additional logic for alarm processing, for example, sending an email or sending notification to Telegram App.
Please refer links under the See Also section to see how to do this.
See Also
Next steps
-
Getting started guides - These guides provide quick overview of main NDU features. Designed to be completed in 15-30 minutes.
-
Installation guides - Learn how to setup NDU on various available operating systems.
-
Connect your device - Learn how to connect devices based on your connectivity technology or solution.
-
Data visualization - These guides contain instructions how to configure complex NDU dashboards.
-
IoT Data analytics - Learn how to use rule engine to perform basic analytics tasks.
-
Hardware samples - Learn how to connect various hardware platforms to NDU.
-
Advanced features - Learn about advanced NDU features.