Check Relation between Entities
The purpose of this tutorial is to show how the Check Relation node can be used to check the relation between Entities.
- Use case
- Prerequisites
- Adding the devices and creating the relation between them
- Message flow
- Configure Rule Chains
- How to verify the Rule Chain and Post telemetry
- See Also
Use case
Let’s assume the following use case:
-
You have 2 devices:
-
Smoke Detector with the Smoke Sensor which sends data to NDU when it appears.
-
Fire Alarm System which provides a fire alarm, when the smoke is present.
-
However, there are different ways for the realization of this case, for example, it can be implemented using the Switch node that routes incoming Message to one or multiple output chains.
For more information about how to use the Switch node, please check the link to The article of Switch Node in the See Also section.
Prerequisites
You need to read the following guides before you start this tutorial:
Adding the devices and creating the relation between them
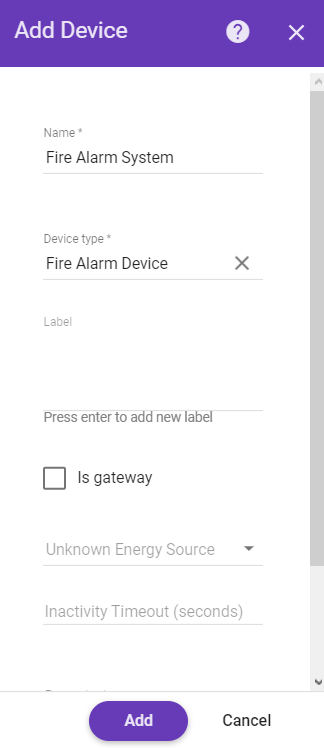
Add two Device entity in NDU:
-
Smoke Detector is represented as a Device. Its name is Smoke Detector and its type is Smoke Sensor.
-
Fire Alarm System is represented as a Device. Its name is Fire Alarm System and its type is Fire Alarm Device.
Create a relation of the type Uses:
- from Smoke Detector to Fire Alarm System;
The following screenshots show how to do this:

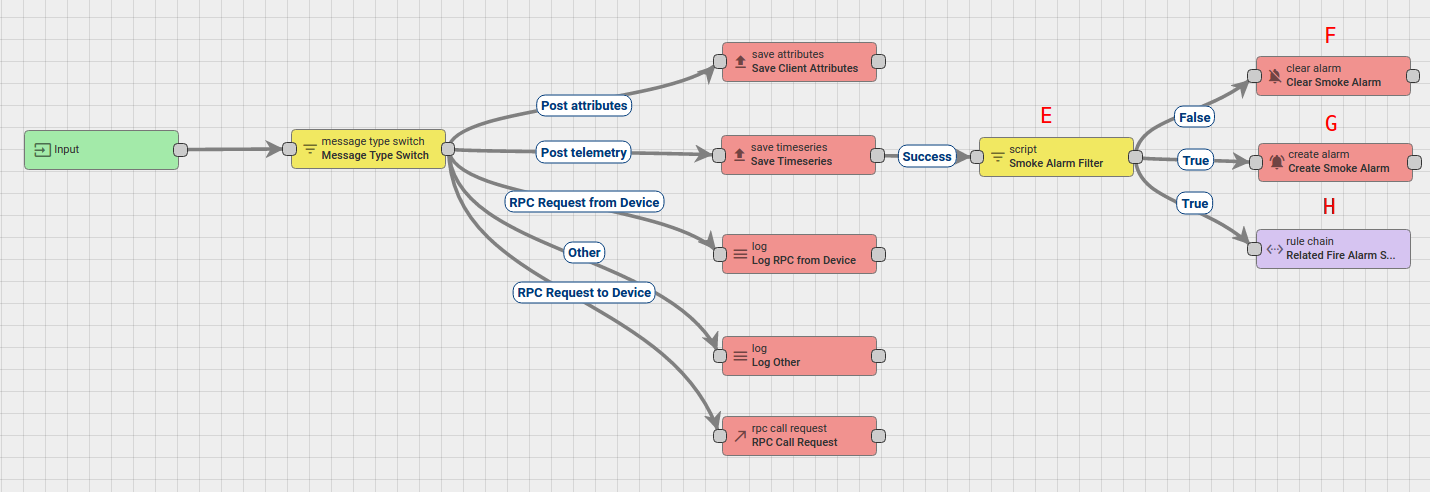
Message flow
In this section, we explain the purpose of each node in this tutorial:
- Node A: Check Relation node.
- Checks the relation from the Device, Fire Alarm System, to the originator of the message Smoke Detector using the type and direction of relation.
- Node B: Change originator node.
- Change the originator from Devices Smoke Detector to the related Device Fire Alarm System and the submitted message will be processed as a message from Device Fire Alarm System.
- Node C: Transformation Script.
- Transform an original message into RPC request message.
- Node D: RPC call request node.
- Takes the message payload and sends it as a response to the Fire Alarm System.
- Node E: Filter Script node.
- Checks if data of incoming message is smoke.
- Node F: Clear alarm node.
- Loads the latest Alarm with configured Alarm Type for Message Originator Smoke Detector and Clears the Alarm if it exists.
- Node G: Create alarm node.
- Tries to load the latest Alarm with configured Alarm Type for Message Originator, namely Smoke Detector.
- Node H: Rule Chain node.
- Forwards incoming Message to specified Rule Chain Related Fire Alarm System.
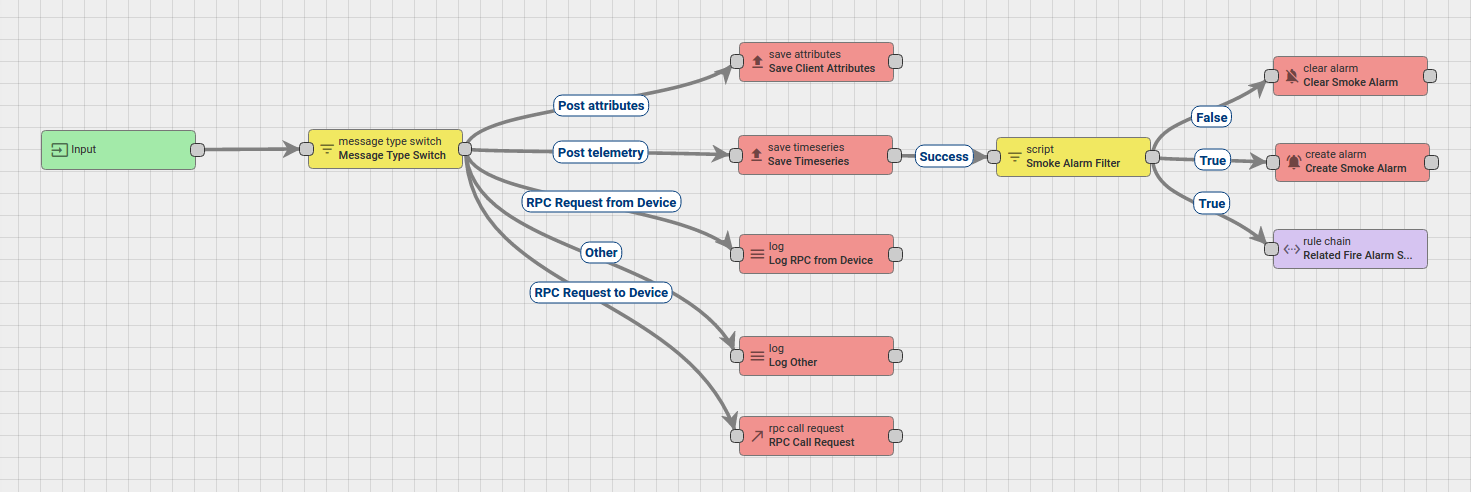
Configure Rule Chains
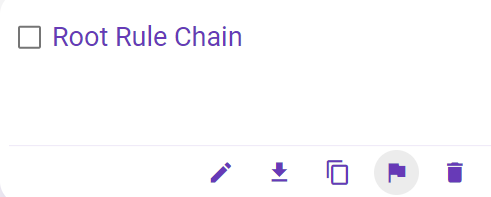
In this tutorial, we modified our Root Rule Chain and also created Rule Chain Related Fire Alarm System
The following screenshots show how the above Rule Chains should look like:
- Related Fire Alarm System:

- Root Rule Chain:
Download the attached json file for the Root Rule Chain. Don’t forget to mark this rule chain as root.
Also, you need to create Related Fire Alarm System Rule Chain or you can download the attached json file for this Chain and import it.
The following section shows you how to create it.
Create new Rule Chain (Related Fire Alarm System)
Go to Rule Chains -> Add new Rule Chain
Configuration:
- Name : Related Fire Alarm System
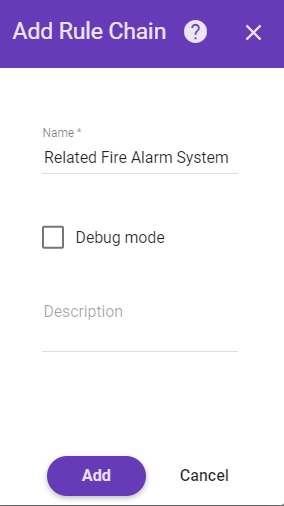
New Rule Chain is created. Press Edit button and configure Chain.
Adding the required nodes
In this rule chain, you will create 4 nodes as it will be explained in the following sections:
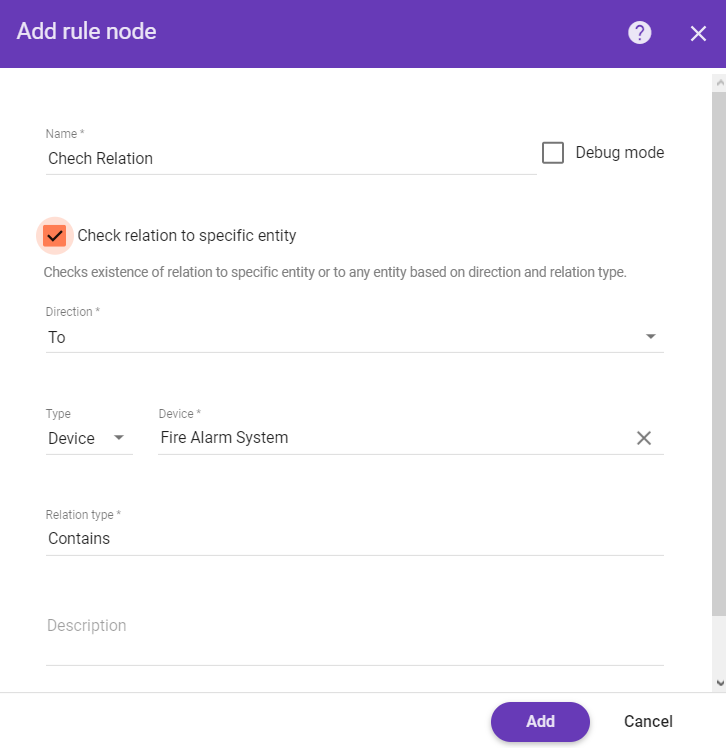
Node A: Check Relation
-
Add the Check Relation node and connect it to the Input node.
This node will check the relation from the Device, Fire Alarm System, to the originator of the message Smoke Detector using the type and direction of relation. If the relation exists, the message will be sent through the True chain.
-
Fill in the fields with the input data shown in the following table:
| Field | Input Data |
| Name | Check Relation |
| Direction | To |
| Type | Device |
| Device | Fire Alarm System |
| Relation type | Uses |
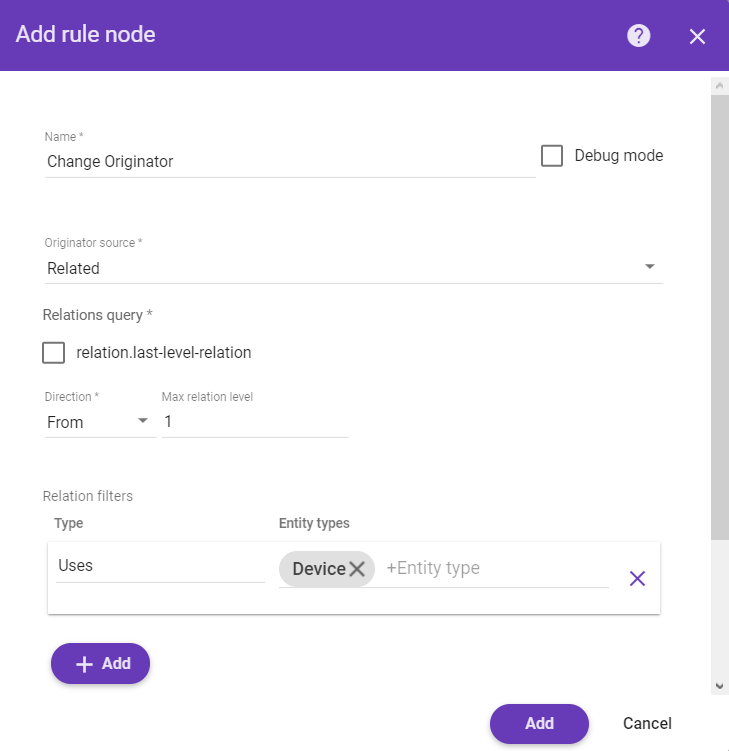
Node B: Change Orignator
-
Add the Change Orignator node and connect it to the Check Relation node with a relation type True.
This node will change the originator from the Device Smoke Detector to the related Device Fire Alarm System and the submitted message will be processed as a message from another entity, namely Fire Alarm System. -
Fill in the fields with the input data shown in the following table:
| Field | Input Data |
| Name | Change Originator |
| Originator source | Related |
| Direction | From |
| Max relationship level | 1 |
| Relation type | Uses |
| Entity type | Device |
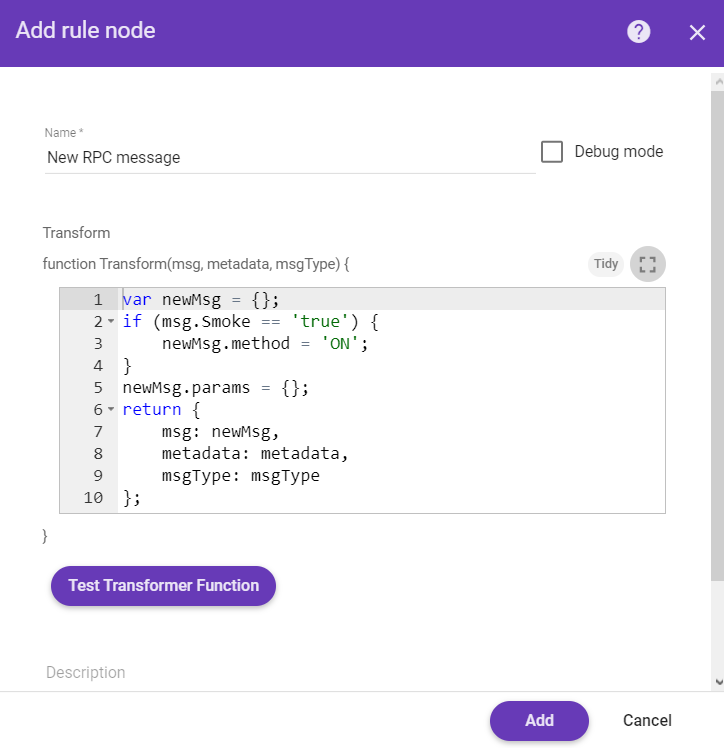
Node C: Script Transformation
- Add the Script Transformation node and connect it to the Change Orignator node with a relation type Success.
This node will transform an original message into RPC request message.
-
The RPC call will have 2 properties:
Property Value method ON params {} -
In order to do this, add the following Script:
1
2
3
4
5
6
    var newMsg = {};
    if(msg.smoke == 'true'){
          newMsg.method = 'ON';
    }
    newMsg.params={};
    return {msg: newMsg, metadata: metadata, msgType: msgType};
- Enter the Name field as New RPC message.
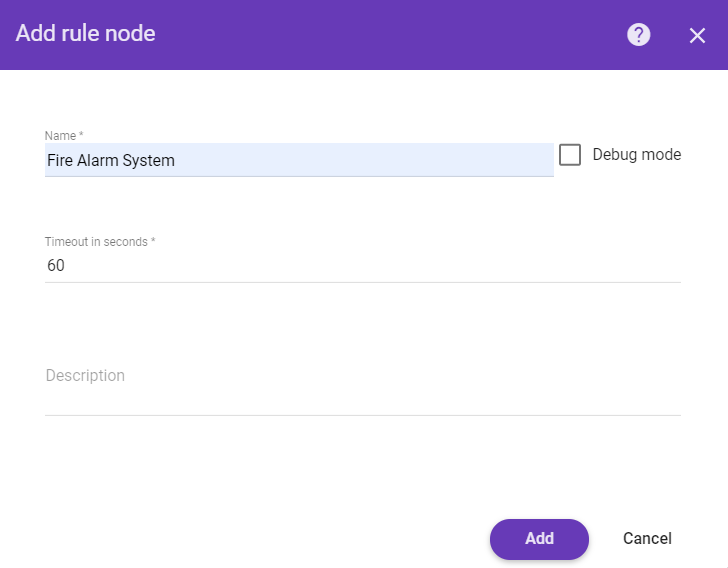
Node D: RPC call request node
- Add the RPC call request node and connect it to the Script Transformation node with a relation type Success.
This node takes the message payload and sends it as a response to the Message Originator Fire Alarm System. - Enter the Name field as Fire Alarm System.
- Enter the Timeout value as 60 seconds.
This Rule chain is ready and we should save it.
Modify Root Rule Chain
The initial Rule Chain has been modified by adding the following nodes:
Node E: Filter Script
- Add the Filter Script node and connect it to the Save Timeseries node with a relation type Success.
This node will check if data of incoming message is smoke using the following script:
1
return msg.smoke== 'true';
- Enter the Name field as Smoke Alarm Filter.

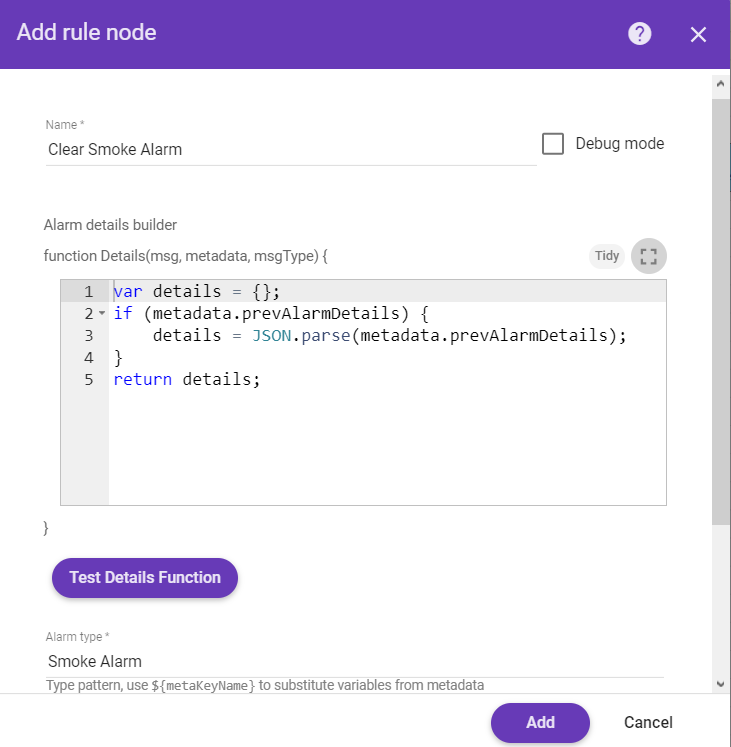
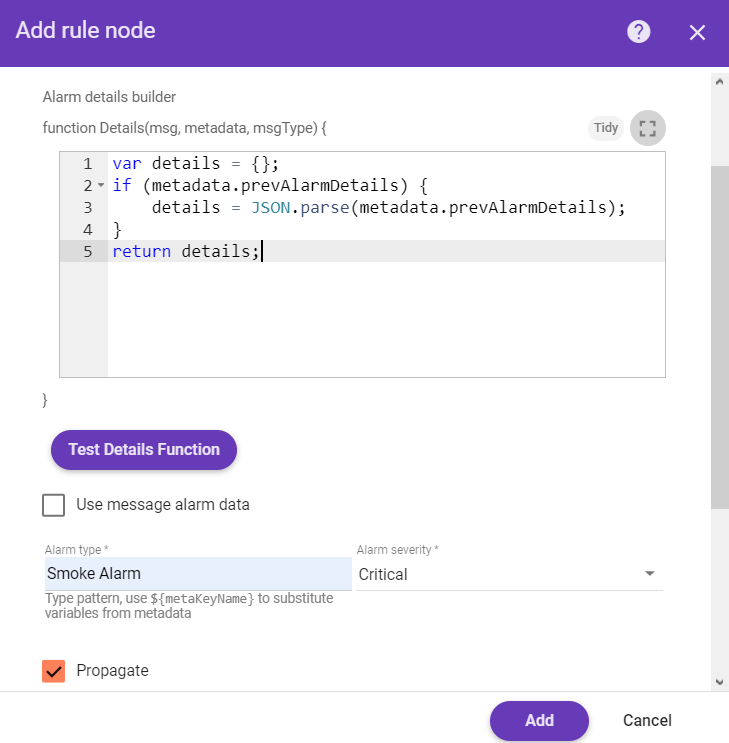
Node F: Clear Alarm
-
Add the Clear Alarm node and connect it to the Filter Script node with a relation type False.
This node loads the latest Alarm with configured Alarm Type for Message Originator Smoke Detector and Clears the Alarm if it exists. -
Enter the Name field as Clear Smoke Alarm and the Alarm type as Smoke Alarm.
Node G: Create alarm
-
Add the Create alarm node and connect it to the Filter Script node with a relation type True.
This node tries to load the latest Alarm with configured Alarm Type for Message Originator, namely Smoke Detector. -
Enter the Name field as Create Smoke Alarm and the Alarm type as Smoke Alarm.
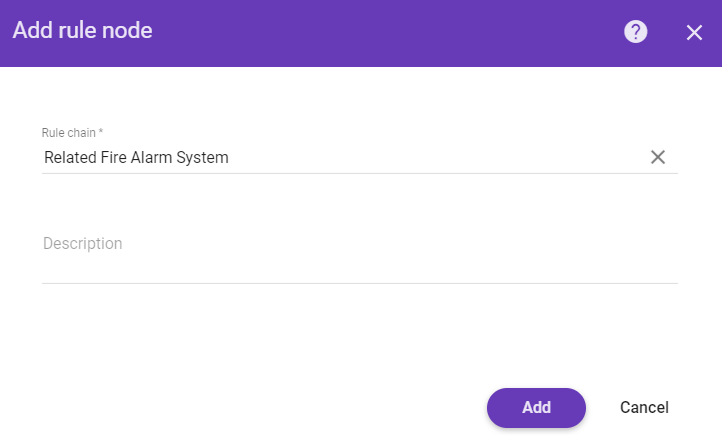
Node H: Rule Chain
-
Add the Rule Chain node and connect it to the Filter Script node with a relation type True.
This node forwards incoming Message to specified Rule Chain Related Fire Alarm System. -
Enter the Name field as Related Fire Alarm System.
The following screenshot shows how the final Root Rule Chain should look like:
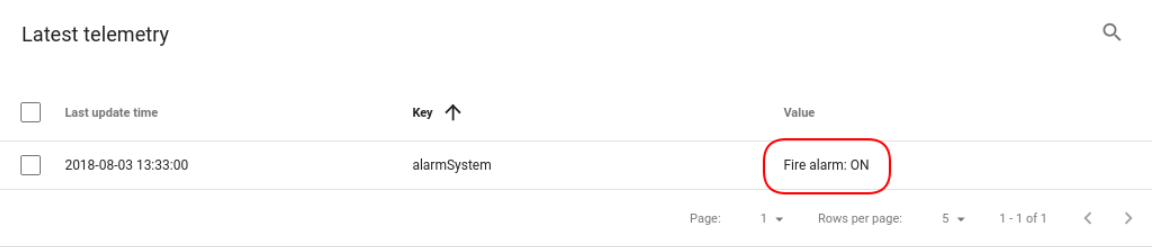
How to verify the Rule Chain and Post telemetry
-
Use the following javascript code to emulate the Fire Alarm System device.
-
To run the script, you need to do the following steps:
-
Copy the Fire Alarm System device access token, then paste them in the script.
You can copy the access token from the Device page.
-
Use the Rest APIs, Telemetry upload APIs, for posting telemetry from the device Smoke Detector.
1
2
3
curl -v -X POST -d '{"smoke":"true"}' http://smartapp.netcad.com/api/v1/$ACCESS_TOKEN/telemetry --header "Content-Type:application/json"

**you need to replace $ACCESS_TOKEN with the actual device token**

Also, you can:
-
configure the Dashboard by adding an alarm widget to visualize the alarms.
-
define an additional logic for alarm processing, for example, sending an email.
Please refer to the third and fourth links under the See Also section to see how to do this.
See Also
-
Switch Node guide - for more information about how to use Switch Node in Thignsboard.
-
Validate incoming telemetry tutorial - for more information about how to validate an incoming telemetry using the Script Filter node.
-
Create & Clear Alarms: configure dashboard guide - to learn how to add an Alarm widget to the dashboard.
-
Send Email tutorial.
-
RPC capabilities guide - for more information about how RPC works in Thignsboard, please refer to the RPC capabilities guide.
Next steps
-
Getting started guides - These guides provide quick overview of main NDU features. Designed to be completed in 15-30 minutes.
-
Installation guides - Learn how to setup NDU on various available operating systems.
-
Connect your device - Learn how to connect devices based on your connectivity technology or solution.
-
Data visualization - These guides contain instructions how to configure complex NDU dashboards.
-
IoT Data analytics - Learn how to use rule engine to perform basic analytics tasks.
-
Hardware samples - Learn how to connect various hardware platforms to NDU.
-
Advanced features - Learn about advanced NDU features.